
How to Tie a Turban: A Step-by-Step Guide to Tying a Sikh Turban (Pagg/Pagdi)
How to Tie An Amazing Sikh Turban
Introduction:
Turbans hold immense cultural and religious significance in various communities around the world. One such community that is closely associated with turbans is the Sikh community.
For Sikhs, the turban, also known as the pagg or pagdi, represents honor, self-respect, and spirituality.
Tying a Sikh turban requires skill and practice, but with the right technique and guidance, it can be achieved.
In this comprehensive guide, we will walk you through the step-by-step process of tying a Sikh turban, offering insights into the art and tradition of pagdi bandhne vala.
People from many religions and cultures wear turbans as a part of everyday attire, and turbans are often associated with followers of the Sikh religion.
Turbans can also be used to protect your head and hair from the sun, or even as a fashion statement.
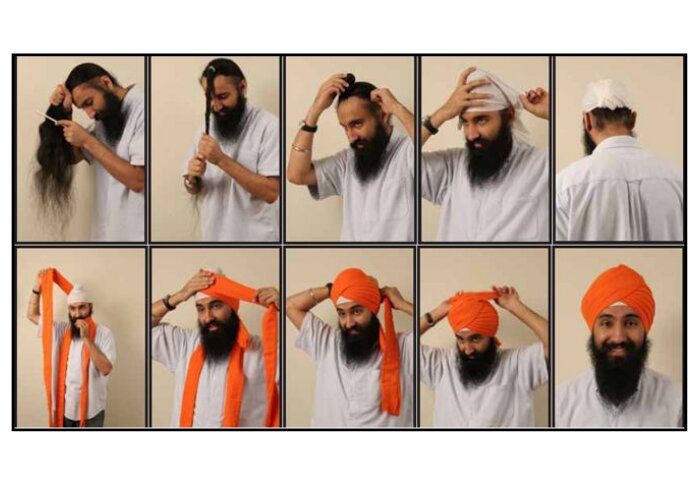
After tying your hair into a top knot to keep it neatly tucked away and to give your turban something to wrap around, all you need is the right cloth and a little bit of practice and you can become an expert at tying a turban.
Understanding the Significance of a Sikh Turban:
Before we delve into the process of tying a Sikh turban, it is essential to appreciate its significance within the Sikh community.
The turban represents a commitment to upholding Sikh values such as equality, humility, and respect.
It serves as a visual representation of Sikh identity and spirituality, symbolizing the crown of righteousness and responsibility.
Gather the Necessary Materials Like Choosing Your Fabric:
To tie a Sikh turban, you will need a few essential materials, including a long piece of cloth called a dastaar or pagri. Traditional turbans are typically made of cotton fabric, with varying colors and designs. It’s recommended to choose a fabric that is around six to seven meters long and approximately one meter wide for optimal results. There are many types of fabrics that can be used to make a turban, including cotton, silk, and wool. You can choose a fabric that suits your personal style and the occasion you’re wearing the turban for.
Creating the Base:
To create a stable base for the turban, fold the fabric on one side and tuck it under the turban at the back of your head. Repeat this step on the other side, crossing the fabric over the previously folded section. This process helps in forming layers that provide structure and stability to the turban.
Prepare Your Hair:
Make sure your hair is clean and dry before you start tying your turban. If you have long hair, tie it up in a bun or braid it to keep it out of the way.
1). Tying a Patka
- Choose a square cotton or polyester cloth designed to be a patka. A Sikh patka is considered a turban for children, but it can help secure your hair and provide a surface for your full pagg turban to fit on smoothly. Patkas can also be worn as turbans for sports. Most patka cloths are made of light cotton, but you can also find polyester sport patkas that are sweat-wicking. Patka cloths are square and have strings attached to each of the four corners.
- Some sports patkas have a built-in headband.
- Tip: Play around with color schemes using your patka. If you plan to do a full turban, your patka can use the same color as your turban fabric to blend in or you can use a different color (maybe even a print) to contrast against your full turban.
Fold The Fabric:
Fold the fabric into a triangle, with one corner pointing down and the other two corners on each side.
Preparing the Turban and Placing the Turban Fabric on the Head:
Begin by neatly folding the turban fabric lengthwise to achieve a long, even strip. Ensure that the folded strip is of appropriate width, usually around five to six inches. This preparation step is crucial as it determines the overall look and stability of the turban. Position the folded end of the turban fabric at the center of your forehead and gently place it over your head. Ensure that the fabric hangs evenly on both sides of your head and that the length of the fabric extends beyond the back of your head. Hold the fabric at the base of the triangle, with the point facing down, and drape it over your head.
Forming & Tucking Pleats:
Gather the fabric hanging on one side of your head, about one and a half feet from the end, and start making pleats. Make approximately five to six pleats, each around two to three inches wide. The number of pleats may vary depending on personal preference and the desired appearance of the turban.
After creating the pleats, carefully tuck them under the turban base at the back of your head. Ensure that the pleats are neatly aligned and evenly spaced. Repeat this process on the other side of your head, making sure that the pleats are symmetrical.
Tuck the ends & Adjust the Turban
Tuck the twisted ends of the fabric into the base of the turban at the back of your head. Use your hands to adjust the turban, making sure it sits comfortably and securely on your head. You can also adjust the shape of the turban by pulling or smoothing the fabric as needed.
Securing, Wrap or Twist the Fabric and Turban:
To secure the turban in place, gently tuck the remaining fabric into the layers at the back of your head. This step requires patience and precision to ensure that the turban stays intact.
Now, take the loose end of the turban fabric and start wrapping it around the base of the turban. Make sure to cover the pleats while maintaining a tight and uniform wrap. Continue wrapping the turban until you reach the end of the fabric.
Use one hand to hold the fabric in place on top of your head, and use the other hand to wrap the fabric around your head, pulling it snugly but not too tightly.
Once the fabric is wrapped around your head, twist the two ends together at the front of your head. Continue twisting until the fabric is tight and secure.
Finishing Touches or Finish the Turban
After securing the turban, take a moment to adjust and refine its appearance. Smooth out any wrinkles, ensure that the turban sits comfortably on your head, and align the front edge with your hairline. This attention to detail adds to the overall elegance and presentation of the turban.
Depending on your personal style and the occasion, you can finish your turban by adding a decorative pin or brooch, or by leaving it plain and simple.
Remember, tying a turban takes practice, so don’t be discouraged if it takes a few tries to get it right. With time and patience, you’ll be able to tie a turban confidently and stylishly.
Conclusion:
Tying a Sikh turban, be it a pagg or pagdi, is an art form that holds deep cultural and religious significance. The process requires patience, practice, and respect for the traditions associated with it. By following the step-by-step guide outlined in this article, you can learn how to tie a Sikh turban and honor the rich heritage and values it represents. Embrace the journey of mastering this skill, and let the turban become a symbol of your identity and commitment to the Sikh way of life.
Contact Us For More Information:
Ph No.: – +919953172004
Email: – info@turbantrainers.com
Take a Look at our work by CLICKING HERE.